F.I.N.A.L.L.Y.
This post has been in the works for a year…maybe longer? Croissants have been a kind of buttery Everest I’ve tried to scale for a long, long time. I slipped and slid a million times along the way but I’m finally so pleased and so relieved to be able to share this post with you. A lot of you know about my adventures which I’ve been sharing on Instagram and have cheered me along, so thaaaank you! Be prepared, this is a long post, with a lot of rambling but I do want to take you through my croissant making journey and everything I learned along the way. All of which I hope will inspire you to make them too!
 So, here’s the deal. Croissants are not technically difficult, as in they have no complicated steps, require no special knowledge or equipment. What they are, is fiddly. And what they reeeeeaally need is patience. So. Much. Patience. I spent so much time hunting for approachable recipes, I got completely lost. Everyone seems to be obsessing over the perfect honeycomb structure, the neatest lamination (folding and rolling the butter in the dough) and the exact degree of wobbliness which indicates a very well risen or ‘proofed’ croissant.
You guys, I was so intimidated. I’m not saying those factors aren’t important but in making them the end goal, the process of making croissants which is basically a form of bread, is just no longer any fun. And I LOVE bread-making, seriously. It should always be fun and enjoyable. And so I made that my goal.

A lot of my fear and struggles with croissant making comes from the fact that a Mumbai kitchen is rarely not hot-gross-humid. So most recipes just didn’t seem to factor in the kind of temperatures and humidity that make working with a buttery dough so much harder. Then I found two approachable recipes that weren’t obsessing over big goals like the honeycomb structure, but they made sure the result was still a lovely, soft, airy, buttery, flaky croissant. One was from Sally’s Baking Addiction and it worked well, although I wasn’t able to scale it down for a more manageable amount of dough which worked better for tiny Indian kitchens. The second was from David Lebovitz who starts off with a small batch aaaand it’s a wholewheat version! Not for ‘health’, just a deeper, more complex flavour. After much pottering around with both recipes, I landed on a hybrid that’s a combination of both, with tweaks and simplifications that worked well for me and I hope you too!

Croissants start off with a basic, slightly stiff dough. Then dough is then rolled and folded three times with a slab of butter in the middle, which is where things start to get sticky. I broke the rules completely and refused to do this just on my kitchen counter. Silicone mats all the way! They make life so much easier in warm climates because when the dough starts to warm up or the butter softens too much, you just slide the mat onto a tray and stick it in the fridge. Side note: I tried using less butter and it just led to bland and boring croissants so stick to the amount mentioned!
Once all those folds are done (with chilling periods in between each), the dough is cut and shaped. Typically, each piece of dough is individually lengthened by hand and then rolled. I found this bit unnecessary and most important, the extra handling of the dough caused it to warm up faster in the heat. So instead, I simply began to roll the dough out into the required length in the first place, and then directly rolled it up. Does that make sense? Basically, you skip a step and still have the dough at the measurement you need. Win win!
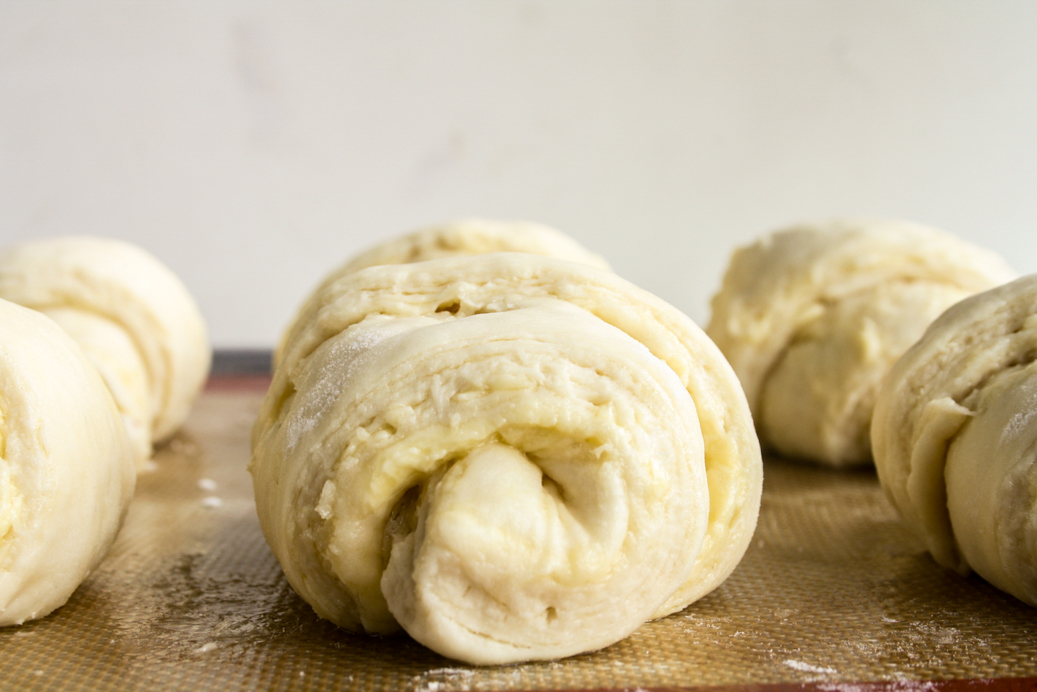
Finally, here’s where the crucial step for the fluffiest texture comes in. You HAVE to let those shaped croissants sit at room temperature for as long as it takes for them to become very soft, puffy and almost doubled. If there’s only one rule you follow, make it this one. Don’t skimp on this final rise time because it will make or break the croissants. When I understood this, my croissants had more defined layers and though they spread a bit more in the oven (as a result of the longer rise time at room temperature), it was honestly not something that bothered me. Because the center was light, airy and each bit of croissant tore off in the buttery, soft layers I hoped for. Up until then, I really struggled with dense centers.

The lamination, the shaping, the rolling, all comes with practice. I’m not saying I’m perfect at it, but I got a lot better by the 5th (or millionth) try. The photos you see in this post are from two different attempts because at times, my shaping was better in one, but the rise was better in another. Consistency really depends not just on practice but the conditions you’re making the croissants in.
Remember two things: keep the dough cold ALL THE TIME and don’t rush the periods of chilling time between each fold. The butter needs that time to firm up and the gluten in the dough needs to relax so that you can roll it easily. Which is why croissants can’t really be made in a day unless you don’t plan to sleep.
On day one, do all of the dough making and lamination. On day two, shape the croissants and bake later in the day. And the bonus third thing to remember is the eggwash. It gives croissants their signature colour, flavour and crispy top layer and though yes, you can skip it or use cream instead, but I think you’ll be missing out on the experience. Above all, have some fun with it! Don’t worry about butter oozing out or the dough having a few creases or the croissants looking a bit wonky, it happens and it’s all part of the process. If you churn out perfect croissants on the first try, please teach me your ways and allow me to throw myself at your feet.

Now I know you’re thinking, why on earth would I want to go through the whole saga when it’s so easy to just buy croissants at a bakery? Wellllll…making croissants is super satisfying. It makes you feel like a rockstar. And breaking off bits of a warm, fresh, homemade croissant is truly one of the greatest joys in a baker’s life. The top is so super flaky, it almost falls apart if you look too hard at it. The center is soft and plush and absolutely irresistible. This makes a respectable batch of 6 croissants so if you eat them all…..it’s totally ok, you earned it!! I have some un-glamourous photos of the process just after the recipe plus every tip and trick I’ve learned along the way. I hope you’ll give these a shot and tell me how you like this! Have fun 🙂
Please read the recipe notes before beginning and preferably, also the post above. And make sure you have a ruler, a sharp knife, two silicone mats as well as space in the fridge to chill the dough and butter as needed.

Homemade Croissants
Ingredients
- 2 and 1/4 tsps active dry yeast
- 2/3 cup lukewarm milk (you should be able to dip a finger into it comfortably)
- 2 tbsps caster sugar
- 2 cups all-purpose flour plus extra for rolling
- 1 and 1/2 tsps salt
- 160 gms unsalted butter, slightly softened
- For the eggwash: 1 egg + 1 tsp salt
Instructions
- In a small bowl, combine the yeast, lukewarm milk and sugar. Stir, cover with clingfilm and set aside for 5 to 10 minutes until very frothy and bubbly.
- Now in the bowl of a stand mixer fitted with a dough hook, combine the flour and salt. Pour in the frothy yeast mixture and mix on low to combine, then switch to medium-high speed and let the dough knead for 2 to 3 minutes until it clears the sides of the bowl, and becomes a smooth, slightly stiff mass (this could take more or less time depending on the flour, temperature etc). Poke it with a finger and if the dough slowly bounces back, it's ready to rise. If not, knead it gently with your hands in the bowl itself till it does bounce back.
- Place the dough on a lightly floured counter, then lightly oil the mixing bowl. Shape the dough into a neat ball and place it back in the greased bowl. Cover the bowl with clingfilm, then place in the refrigerator for 4 to 6 hours until doubled. This is a slow rising dough that develops a deeper flavour and also must be very cold, therefore the rise is all done in the fridge.
- When the dough has almost doubled, place the butter in a small bowl and mix it with a spoon until smooth, with not even tiny lumps. Spoon it out onto a silicone mat and shape into a 4x3 inch rectangle. Slide the mat onto a tray and place it in the fridge for 20 to 30 minutes, until firm but not hard. If you lift a corner of the butter slab, it should be a little flexible and not break off immediately. If you're having trouble shaping it into the exact size, wait till it's chilled a bit and then even out the edges.
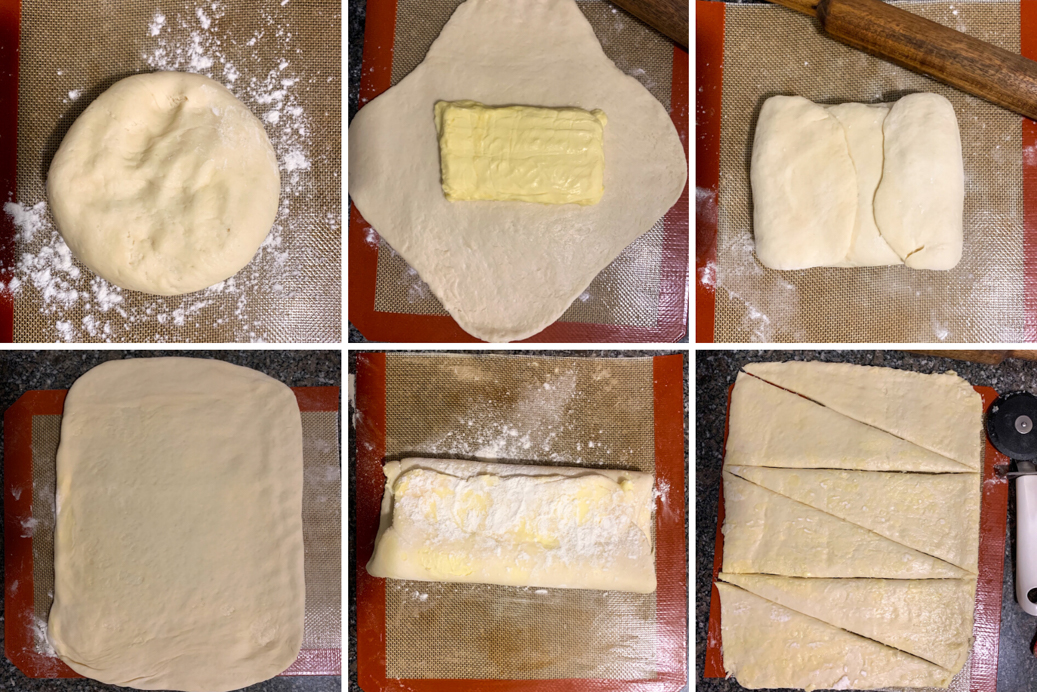
- Now get out your dough and place it on another lightly floured silicone mat. It will feel quite stiff at this point but don't worry. Use a rolling pin to press it down a few times to flatten, then roll it out into a kind of diamond shape with flaps on 4 ends (see photos below). You don't have to be too precise with the measurement here. What is important is that the flaps are a little thinner than the center and long enough to enclose the butter. The center should also be broad enough to hold the entire butter slab.
- Place the chilled butter in the center of your rolled out dough. Fold the flaps over it to enclose it completely. Press down with the rolling pin again to flatten the entire mass a bit. At this stage if your dough starts to feel warm, place it in the fridge for 10 minutes. If not, roll it out into a 12x9 inch rectangle. As you're rolling, the dough will start to take an oval shape, so do your best to keep it rectangular by using your hands to stretch and shape it. Now fold the top of the rectangle to the center and the bottom over it, like a letter. You will now have a narrow rectangle of dough. Cover with clingfilm, slide the mat onto a baking tray and place it in the fridge for 1 hour. First roll done!
- After 1 hour, uncover the chilled dough and slide the mat back onto the counter (see why I love using mats, so easy to transfer the dough back and forth!). Rotate the mat so that the short side of the rectangle is now facing you. Roll it out again, lightly flouring as needed, into a 12x9 rectangle. Repeat the fold as above, cover and chill for 1 more hour. Second roll done!
- During this roll and fold process, if you see butter leaking out, lightly flour the spot and place the dough in the fridge to firm up again. Alternately, I also find that placing a sheet of clingfilm over the dough and rolling on top of it helps a lot with stickiness. Some butter leaking out is inevitable in a warm kitchen, so don't fret about it, just chill the dough as often as needed. If there are air bubbles in your dough, prick them with a toothpick and continue rolling. If there are creases in the dough, do your best to smooth them over with the rolling pin.
- Rotate the mat yet again so that the shorter side is facing you and repeat the roll and fold a third and final time. Cover the dough tightly, slide the mat onto the tray and place it in the fridge for an overnight rest.
- The next day, uncover the chilled dough and roll again into a 12x11 rectangle. I promise we're getting to the end! Trim the edges of the rectangle if needed, to make neat edges. You will only need to trim off a few centimeters so no harm done.
- Now use your ruler to help cut the dough into 3 equal rectangles (ideally 4 inches wide, but if you trimmed the edges, you'll have to reduce this a bit). Then cut each rectangle diagonally. You will now have 6 triangles.
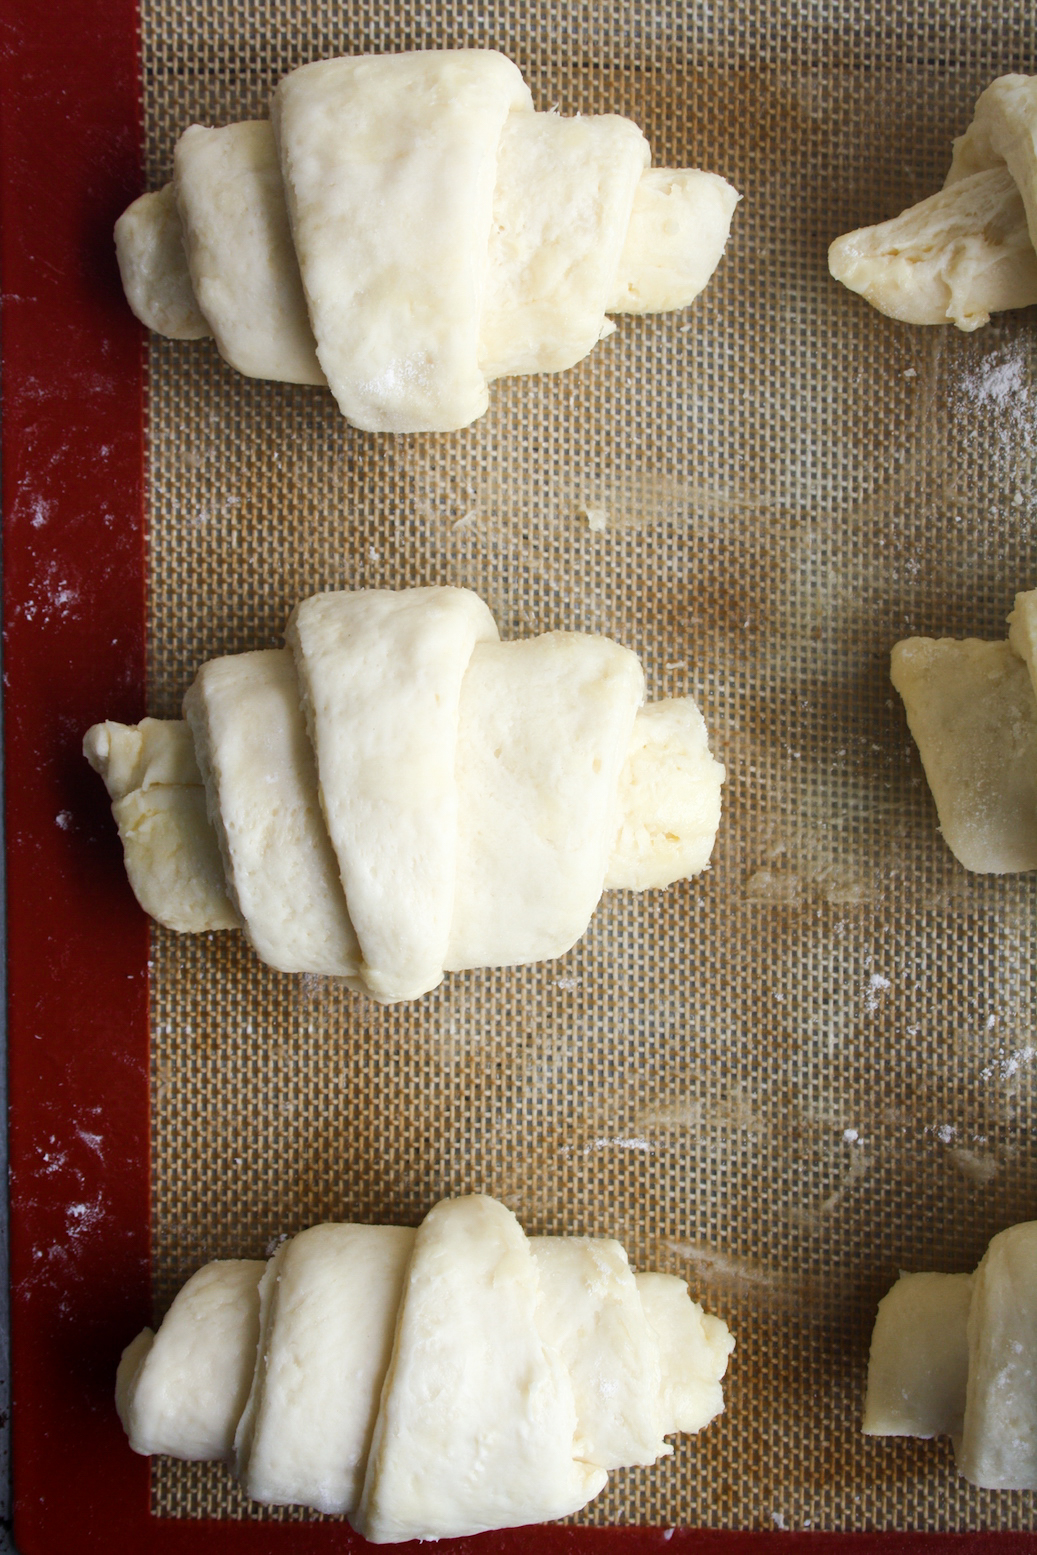
- Lift up one of the triangles and slide the mat with the remaining triangles back onto a tray and place in the fridge. Lightly flour your kitchen counter and place the triangle of dough on it. Roll it up tightly starting at the broad end. A personal tip from experience: If you feel the underside of the triangle is neater, flip it over so that when you roll it up, the shaped croissant is smooth and neat.
- Place the croissant back on the mat and repeat with the rest. Space each croissant out at least 2 inches apart and make sure the triangles are cold when you're rolling them.
- Now cover the tray with the shaped croissants fairly tightly with clingfilm. It's important to make sure no air can get in, so that a nice warm environment is created. Let them rest at room temperature for 3 to 4 hours until very puffy and almost doubled. When you lift off the clingfilm and shake the tray a bit, the croissants should have a slight wobble. The layers will also be more clearly defined. That's when you know they're ready to be baked.
- At this stage, I like to place the croissants in the fridge for 20 minutes. Since the room temperature rise takes a while, the butter will soften. Chilling the croissants briefly before baking helps counter this. Remember that cold butter creates the flaky layers.
- Now preheat the oven to 200 C. Lightly beat the egg in a small bowl, then stir in the salt.
- Brush the croissants generously with the eggwash, making sure you get it all over the top, sides and any nooks and crannies.
- Place the tray in the oven (FINALLY!!) and bake for 20 to 25 minutes until the croissants are puffed and deeply golden-brown. Some butter may leak out during the baking, but it will get absorbed back in.
- Allow the croissants to cool at room temperature for 20 minutes. This is important to make sure they're fully cooked inside. Then, break into the still warm, super flaky, deliciously buttery, beautiful batch of croissants you just made! Congratulate yourself and eat them all with jam, it's perfectly acceptable 🙂
- Store leftover croissants in the fridge for 2 to 3 days, reheating in the microwave or oven. Have some fun while doing this and let me know how it goes for you. Happy baking!
Notes
Shop this recipe!
Check out a full list of my baking essentials here!
This post contains affiliate links.


Can I use instant yeast? And how much?
I wouldn’t recommend it here since the dough needs a slower rise which is better with active dry yeast
Please could you give weight of the ingredients in grams? Thsnk you !
Hi Jaya, I’m in the process of updating older recipes with weight measurements but here’s the conversion chart I use: https://www.kingarthurbaking.com/learn/ingredient-weight-chart