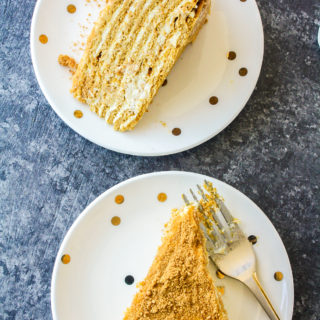
Russian Honey Cake
A delicious sweet and tangy cake with spiced biscuits and a sour cream frosting!
Prep Time: 2 hours
Cook Time: 1 hour
Total Time: 3 hours
Makes: 8 " cake
Ingredients
For the cake
- 3 and 1/2 cups all-purpose flour
- 1/2 tsp ginger powder
- 1/2 tsp cinnamon powder
- 1/2 cup honey
- 1/2 cup butter, at room temp (salted or unsalted)
- 1/2 cup caster sugar
- 1 tsp baking soda
- 3 eggs (see notes)
- 1/4 tsp salt
- 1 tsp vanilla extract
For the filling
- 500 gms sour cream / hung curd
- 400 gms condensed milk
- 1/2 cup whipping cream, chilled
Instructions
- Sift the flour and spices in a large bowl. Set aside.
- In a sturdy, deep saucepan or pot, combine the honey, butter and sugar. Place on low heat and stir frequently until melted. It will begin to simmer, then bubble and look frothy. Plus it'll smell amazing! At this point, add the baking soda, stir quickly and take the pot off the heat. The mixture will change colour, darken and bubble up a lot. It will almost double in volume.
- Set aside to cool and settle for a few minutes. If using a stand mixer for the next step, pour this mixture into the bowl and fit the whisk attachment.
- In a smaller bowl, lightly beat the eggs. Now holding the bowl high, pour the eggs into the still warm butter-honey mixture in a very thin stream. This prevents the eggs from cooking as soon as they hit the mixture. If using your hands, whisk constantly with one hand while pouring with the other. If using your stand mixer, keep the mixer running at high speed until the eggs are completely mixed in. The mixture will darken and look thinner. Mix in the vanilla and salt.
- Now switch to the paddle attachment on the stand mixer, or a sturdy silicone spatula if using your hands.
- Add the flour gradually and let the mixer run constantly on low speed to beat it all in. If using a spatula, this is going to take some muscle work. The dough is thick, sticky and bread-like.
- Lightly flour a silicone baking mat (or the kitchen counter if you prefer). Keep two baking trays and an extra silicone mat or two sheets of baking paper ready. Preheat the oven to 175 C.
- Scrape the dough out onto the floured surface. Give it a couple of quick kneads to bring it together, then pat into a smooth round and cut into 8 equal pieces. Set aside each peace on a lightly floured surface, making sure they aren't sticking to each other.
- Working with one piece at a time, roll it out thinly into a roughly 9" round. If you're doing this on a silicone mat, there will be very little sticking. Sprinkle flour lightly as needed. Place an 8" plate (I used my cake tin base. You can also use a bowl 8" in diameter) on the rolled out dough and press lightly. Trim the edges (save all the trimmings!) and lift the plate off. You should have a perfectly round circle, yay!
- Prick the circle of dough all over with a fork, then slide the mat onto a baking tray and bake for 7 to 10 minutes until lightly browned and puffed. I stuck to 10 mins baking time because I found the cookies were going soft quite fast when left at room temperature because of the humidity. If it's not very warm where you are, 6 to 7 minutes should be enough. Remember that they will soften once they absorb the filling so they shouldn't be under-baked. Either way, keep a close eye on the cookies as ovens vary.
- Repeat with each remaining piece of dough. Roll out the next one while the previous is in the oven. Slide it in while that earlier one is cooling and so on. Once you get the assembly line going, it's quite fast!
- Allow the cookies to cool completely at room temperature. In the meantime, ball up the trimmings and roll them out thinly, in any shape. Bake for about 10 to 15 minutes (depending on thickness) or until crisp and darkened much more than the individual cookie layers you just baked. Allow to cool, then break into pieces. Blitz them in a food processor until finely crumbed. You will likely have more cookie crumbs than needed to decorate the cake, so if you prefer, blitz up only half the amount and then see if you'd like to blitz the rest of the pieces too, or keep them for snacking!
- When the cookies are completely cool, bring out a large serving platter.
- In a mixing bowl, beat the sour cream/hung curd with a hand mixer for a few seconds, then add half the condensed milk and beat again till smooth and creamy. Add the whipping cream and beat till the mixture thickens and very soft, rounded peaks form when you lift the beaters up. You are not looking to fully beat it as you normally would with whipping cream, just enough to give the filling some structure. Now taste it and add the remaining condensed milk a little at a time as needed. I did use the whole amount, but wouldn't have minded a little lesser as well.
- Place one cookie on the cake plate. Top with 1/2 cup frosting and spread it around evenly, leaving a thin border around the edge as it will spread. Place the next cookie on top and repeat till all 8 layers are frosted, including the top of the final layer. Sprinkle on some of the cookie crumbs all over the top. Place in the fridge overnight to chill, along with the remaining frosting which is about 1/2 cup. This overnight chill helps the cake soften so that it holds together when you frost the sides.
- The next day, spread the frosting on the sides. Now sprinkle the crumbs on the sides as well. It's ok if most of them end up on the plate, simply pick them up and patch up any unfrosted bits. The beauty is in the layers when you cut the cake, so don't fret about the crumbs! Let the cake chill again for about 2 hours.
- Slice into even pieces using a sharp, long knife for best results. Admire your work, praise yourself and dive in! This cake needs to be stored in the fridge at all times where it will keep for 4 to 5 days. It can also be frozen for longer.
Notes
*To make the hung curd, hang 1 kg of plain yoghurt in a muslin cloth till all the whey has drained out, about 4 hours. Place a bowl underneath to catch the liquid as it drains. It is a good idea to start this process before you begin the rest of the cake, so that you are ready to frost as soon as the cookies cool.
*The dough needs to be rolled out while it was still a little warm and soft. If you find it's cooling down to the point where you can't roll it anymore, microwave each piece for about 5 seconds just to soften it.
*I don't know of egg substitutes that will work here. The eggs bind the dough and give the cookies structure. While I have used milk as a replacement in the past, I haven't tried it here.
*I read about other filling variations like sour cream + honey / sour cream + whipping cream + sugar in case that's something you want to try out. I will report back if I do!
*Prep-time does not include chilling time.
* Adapted from Smitten Kitchen and Bake From Scratch