Eggless Triple Chocolate Layer Cake
Soft, eggless dark chocolate cake with chocolate chips and a whipped chocolate ganache frosting
Prep Time: 45 minutes
Cook Time: 50 minutes
Total Time: 1 hour 35 minutes
Makes: 8 slices
Ingredients
For the cake
- 1 cup whole milk + 1 tsp lemon juice (250 ml; or use buttermilk)
- 1/3 cup vegetable oil (80 ml; see notes)
- 1/3 cup melted butter (75 gms butter before melting)
- 1 and 1/2 tsps vanilla extract
- 1 and 1/2 cups soft brown sugar, light or dark (320 gms)
- 1 and 1/2 cups all-purpose flour (180 gms)
- 2/3 cup cocoa powder (55 gms)
- 1 tsp baking soda
- 1/2 tsp baking powder
- 1/4 tsp salt
- 1/2 cup dark chocolate chips
For the whipped ganache frosting
- 75 gms dark chocolate (70% to 75%), finely chopped
- 3/4 cup whipping cream (190 ml; I use Amul)
- 3 tbsps icing sugar (reduce if using a sweeter chocolate)
- 1/4 tsp vanilla extract
Instructions
- Preheat the oven to 175 C. Grease a 9-inch springform tin and set aside.
- To make the batter, first combine the milk and lemon juice in a small bowl, stir and set aside to let it curdle.
- In a mixing bowl, whisk together the oil and butter, then add the sugar and vanilla and whisk again till combined.
- Sift in the flour, cocoa, baking soda, baking powder and salt. Fold gently to combine, then add the soured milk a little at a time, continuing to fold it all together with a spatula. The batter is smooth and pourable, but not runny.
- Finally, stir in the chocolate chips (feel free to add more!). Transfer the batter to the prepared tin and smoothen the top. Bake for 45 to 50 minutes until a toothpick poked in the center comes out clean. Set aside to cool completely.
- While the cake is cooling, make the ganache for the frosting. Add the chopped chocolate to a heatproof bowl. Then in a small saucepan, heat the cream on low until hot but not simmering. Pour over the chocolate and let it rest for a few minutes. Then stir gently with a spatula to melt the chocolate completely and you'll have a smooth, runny ganache. See photos below.
- Refrigerate the ganache for 1 hour. When ready to assemble the cake, whip the ganache with the powdered sugar and vanilla, using a hand mixer on medium-high speed for 3 to 4 minutes until soft peaks form and the ganache is now pale, thick and fluffy. Keep refrigerated while you slice the cake.
- Remove the sides of the springform pan (I leave the cake on the base of the pan itself, but you can transfer it if you wish to a serving platter using a large metal spatula). Slice the cake into two horizontally. Gently lift the top half off and place on a plate nearby.
- Spread about half of the whipped ganache all over the bottom half of the cake, in an even layer. Carefully lift the top half and place it over the ganache layer and press down gently.
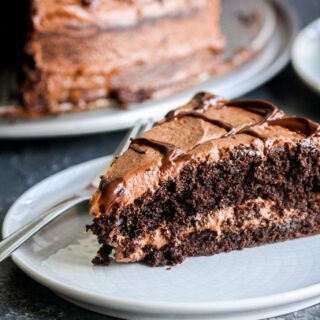
- Cover the top and sides with the rest of the ganache. I like to leave the sides lightly frosted for more of a 'naked cake' look. For the chocolate sauce decoration on top, see notes below.
- You can slice the cake immediately after frosting. Otherwise, store in the refrigerator, covered and then bring to room temperature before slicing so the frosting and cake both soften.
- Store individual slices in an airtight tin in the fridge for 5 to 6 days. Happy baking!
Notes
*I like the combination of oil and butter for moisture and flavour. But for an even more moist cake, you can use only oil (a total of 2/3rd cup). I wouldn't recommend only butter as the cake will be on the drier side.
*The chocolate sauce I used here was on a whim, leftover from another recipe. I melted together 50 gms chocolate and 1 tbsp butter in the microwave, stirred it till smooth and then drizzled it onto the cake in parallel lines with a spoon. It's not very runny, so the lines may not be perfect, that's ok. Then take a toothpick and drag it through the lines of chocolate in the opposite direction so you have this checked pattern. Or get creative and decorate however you want :)
*Prep time does not include cooling/chilling time.