Homemade Cinnamon Sticks (Eggless)
Flaky buttery Danish dough twists coated in cinnamon sugar
Prep Time: 30 minutes
Cook Time: 25 minutes
Total Time: 55 minutes
Makes: 20 cinnamon sticks
Ingredients
For the dough
- 2 tsps active dry yeast
- 1/3 cup warm milk (80 ml; you should be able to dip a finger in comfortably)
- 1 and 1/2 cups all-purpose flour (160 gms, plus extra for rolling as needed)
- 1/2 tsp salt if using unsalted butter
- 3 tbsps caster sugar
- 200 gms butter, frozen
For the cinnamon sugar filling
- 2 tbsps butter, at room temp (30 gms, salted or unsalted)
- 1/3 cup caster sugar (60 gms)
- 2 tsps cinnamon powder
Instructions
- This is a great recipe to start the day before you plan to eat the cinnamon sticks because the dough needs an overnight refrigeration, so set aside time accordingly.
- In a bowl, combine the warm milk, yeast and 1 tablespoon of the sugar. Stir, cover tightly with clingfilm and set aside for about 10 minutes until bubbly and frothy. If this doesn't happen, the yeast may be expired, or the milk was too hot or too cold. Start over if needed because the dough won't rise without this step.
- Now in a large mixing bowl, combine the flour, remaining sugar and salt, then grate the frozen butter right into the bowl. Keeping the butter frozen makes it easier to grate and mix into the dough, and therefore the dough doesn't need to be overworked which often causes the butter to soften quickly, in hot temperatures especially. The key to a flaky Danish dough is keeping the butter cold at all times.
- Now use your fingertips to quickly rub the frozen butter into the flour until there is barely any dry flour left but there are still bigger pieces of butter left in it, which create the flaky texture. You are not looking to mix the butter in completely, just until the mixture is the texture of coarse breadcrumbs.
- Now pour in the yeast mixture and use a silicone spatula or wooden spoon to bring the dough together into a rough mass (see photos below). Do not knead the dough. Simply stir very gently to moisten all of it (at this stage the milk is still a bit warm so the butter will soften), till you have a thick and sticky dough. This takes just a few seconds. Tip it out onto a large piece of clingfilm, pat into a rough 5x5 square and wrap tightly. Refrigerate for 4 fours.
- Lay out a silicone mat on your kitchen counter and lightly sprinkle flour on it. (You can do the next few steps on the counter directly but the mat makes it a thousand times easier to transfer the dough back to the fridge as needed if the butter starts to melt and makes clean up much faster, so I highly recommend it).
- Unwrap the cold dough which will now look a little puffy because of the yeast slowly working during the four hour chill time. Place it on the mat, lightly sprinkle the top of the dough with flour, then cover with a large sheet of clingfilm. I find this useful because the rolling pin remains free of sticky dough and the rolling in general is easier through the plastic, but you can do it without if you're working in a cool kitchen.
- Press down on the dough a few times with a rolling pin to lightly flatten it then roll out into an 8x10 inch rectangle. You don't need to be super precise but it's useful to have a ruler or measuring tape on hand. Try to stop the dough from becoming oval shaped, keep stretching the corners as needed.
- Once rolled out, lift the top third of the dough and fold it to the center. Then lift the bottom third over it, to make a rectangle shape, as if you were folding a letter (see photo below). If the dough feels very soft, you can also lift the edges of the mat itself instead of trying to lift the dough. Peel back the mat and that's it! If needed, use a sharp knife to unstick it from wherever needed.
- Cover this rectangle of dough lightly with the same sheet of clingfilm and slide the mat onto a baking tray. Place in the fridge for about 20 minutes.
- Now rotate the mat so that the shorter end of the rectangle is facing you. Repeat the rolling and folding the same way, then chill for another 20 minutes. Then rotate the dough yet again, roll and fold one last time for a total of three folds.
- Wrap this final rectangle of dough in clingfilm and let it rest in the fridge for about 12 hours. At this point you can even freeze the dough for future use.
- The next day, it's time to form the cinnamon sticks! Keep the filling ready by having the butter at hand, and mixing the cinnamon and sugar together in a small bowl.
- Unwrap the dough and cut it into two equal parts. Place one part back into the fridge and the second on a lightly floured silicone mat. Cover with clingfilm and roll into a 6x10 inch rectangle, this time being as precise as you can. Spread half the butter all over the dough, and then spread a third of the cinnamon sugar mixture all over it in an even layer. Press down lightly with a spoon to help the sugar stick. Slice the dough into 10 equal strips of 1 inch width. Don't separate them just yet. Slide the mat onto a baking tray and refrigerate for 30 minutes. I found this extra chilling makes it much easier to shape the sticks. Repeat this step with the second half of the dough. You will have some of the cinnamon sugar left over which will be used soon!
- Preheat the oven to 200 C. Have either an extra silicone mat ready on a baking tray or a baking tray lined with non-stick baking paper.
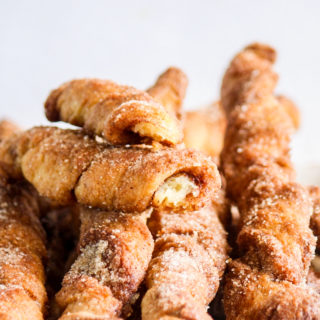
- Now separate the chilled strips of the dough by gently prising them apart with a sharp knife or metal spatula, then twisting them gently to create the cinnamon stick shapes (see photo below). Place each stick about half an inch apart on the prepared baking tray and press the ends in a little to make a tighter spiral that won't unravel during baking. Once they're all done, sprinkle again with the remaining cinnamon sugar because some of it will have inevitably fallen off as you did the twisting.
- Finally, place in the oven to bake for 20 to 25 minutes (see notes) until browned on top and fragrant. Rotate the tray halfway through the baking time for even browning. The cinnamon sticks will be soft when they're first out of the oven, but will firm up in a few minutes creating crispy exteriors and softer insides. I bake one batch at a time (from one half of the dough at a time) but if your oven can fit two batches at once, feel free to do that.
- Cinnamon sticks are best eaten warm and fresh, but can be stored at room temperature for 2 to 3 days (they will soften once covered), or refrigerated for a week. Reheat gently in the oven before eating. Happy baking!
Notes
*If you want the cinnamon sticks to be less crispy on the outside, you can bake for 5 minutes lesser, or bake them at a lower temp of 180 C.
*Cook time is per batch. Prep time does not including chilling / freezing time.
*Dough adapted from The Wood and Spoon