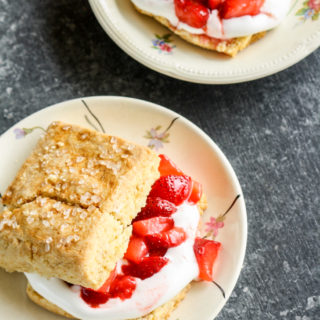
Strawberry Sour Cream Shortcakes
Tender, buttery sour cream biscuits sandwiched with fresh strawberries and sweetened whipped cream
Prep Time: 30 minutes
Cook Time: 25 minutes
Total Time: 55 minutes
Makes: 6 shortcakes
Ingredients
For the biscuits
- 2 cups all-purpose flour (240 gms)
- 1 and 1/2 tsps baking powder
- 1/4 tsp baking soda
- 4 tsps caster sugar (see notes)
- 1/2 tsp salt if using unsalted butter
- Zest of 1 small lemon
- 115 gms butter, cold and cubed
- 3/4 cup chilled sour cream (180 gms) (see notes)
- 1/3 cup chilled whipping cream (80 ml)
- 1 tbsp cream + 2 tbsps granulated sugar to finish, optional
For the strawberries
- 350 gms fresh strawberries
- 2 to 3 tsps caster sugar, depending on sweetness of berries
For the whipped cream
- 1/3 cup chilled whipping cream (80 ml) (see notes)
- 2 tsps caster sugar
- 1/4 tsp vanilla extract
Instructions
- In a mixing bowl, combine the flour, baking powder, baking soda, sugar and salt (if using). Stir to combine, then add the lemon zest and stir again.
- Now add the cold, cubed butter to the bowl and use your fingertips to rub it into the flour, until there are pea-sized bits of butter scattered throughout and the dough somewhat resembles coarse breadcrumbs. The bits of butter are what will create a great end result so don't work it all into the dough!
- In another bowl whisk together the sour cream and whipping cream. Pour into the flour-butter mixture and use a silicone spatula or wooden spoon to stir into a shaggy dough. Now use your hands to gently knead it for just a few seconds and bring it together into a mass. The dough is soft and a little moist. Don't worry about making it super smooth, over-kneading the dough will cause the biscuits to become dense and tough.
- Place the dough on a silicone baking mat and flatten with your hands into a 6 inch square. Cut it into 4 equal squares, then stack them one on top of the other to form a little tower which creates buttery layers as the biscuits bake. Flatten this tower with your hands (the dough is soft and will yield easily) and pat it into a rectangle that's 7.5x5 inches. If at any point the dough starts to warm up or the butter melts, stick it in the fridge before proceeding.
- Now cut the rectangle into 6 equal pieces. Separate them, leaving about 2 inches between each and space them around the baking mat. Slide the mat onto a tray and place in the freezer for 10 minutes. I preferred to freeze them for about 20 minutes since it was warmish in my kitchen. The idea is to keep them very cold so they don't spread and instead rise up nice and tall and flaky.
- Preheat the oven to 200 C. Now rinse your strawberries, chop off the stems and slice them (or quarter them if you prefer). Add them to a bowl, then sprinkle the sugar over them and mix well to combine. Place in the fridge to keep them cold and let them release their juices.
- Finally, make the whipped cream. Add the whipping cream, sugar and vanilla to a large mixing bowl and beat with a hand mixer on medium speed until the cream thickens, increases in volume, and forms soft, rounded peaks. Place this in the fridge as well, it will remain thick and hold it's shape better when you assemble the shortcakes.
- Now it's time to bake the biscuits! Brush the tops of the cold dough squares with cream and then sprinkle evenly with the granulated sugar. This is optional but adds a nice colour and crunch.
- Bake for 25 to 30 minutes (if you froze the dough for longer) until the shortcakes have risen, turned golden brown and have some cracks on top (this is inevitable, don't worry). Avoid over-baking because they will dry out and also become much harder to slice without falling apart.
- Let the biscuits cool to almost room temperature (they will fall slightly), then use a sharp knife to slice each one in half horizontally. Place about 2 tablespoons of cream on the lower half of each, followed by the strawberries, diving them equally among each. Pour some of the juices on too! Place the top half of the biscuits on the berries and dig in. Shortcakes are definitely a little messy to eat but that's ok! I also found that placing the assembled shortcake in the fridge for about 10 minutes firms them up just enough that they can be eaten like a sandwich which sounds like a really fun concept to me!
- Shortcakes are best made and eaten fresh, but the biscuits can be stored at room temperature for a day or two (they will dry out a little) and so can the cream and strawberries, separately stored in the fridge. Alternately, assembled shortcakes can be kept in an airtight tin in the fridge for 2 to 3 days and brought to room temperature before eating. They will of course be a little less tender but it's an option if you're not able to finish them all in one sitting! Happy baking!
Notes
*I used RRO Dairy sour cream available at Nature's Basket and on Big Basket. Other Indian brands that make sour cream are Mooz and Amul. I have not tried any substitutes here although thick Greek yoghurt or hung curd might work.
*I used Amul whipping cream here, which I normally find on Big Basket. Before whipping the cream, chill your bowl and beaters for 20 minutes. And the cream should be chilled for at least 24 hours.
*You could add more sugar to the biscuit dough if you prefer as they're not too sweet by themselves. I found the flavour nicely balanced once combined with the cream and strawberries, but you can in fact add more sugar to any of the three components.
*Keeping the butter, cream and sour cream cold is essential to a tender and flaky result.
*The original Bon Appetit recipe uses a much larger amount of strawberries and whipped cream, if that's how you want to do it!