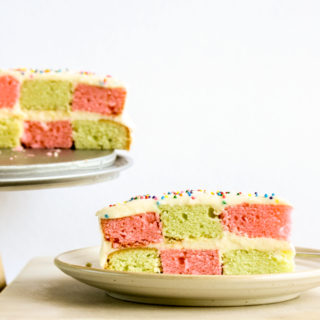
Checkerboard Cake
Classic vanilla butter cake in a two-coloured checkerboard pattern with tangy cream cheese frosting!
Prep Time: 1 hour
Cook Time: 1 hour
Total Time: 2 hours
Makes: 8 large slices
Ingredients
For the pink cake
- 1/2 cup caster sugar (95 gms)
- 100 gms butter, at room temperature
- 2 eggs at room temperature (see notes)
- 1 tsp vanilla extract
- 1 cup all-purpose flour (120 gms)
- 1 tsp baking powder
- 1/4 tsp salt, if using unsalted butter
- 2 to 3 drops pink gel food colour
For the green cake
- 1/2 cup caster sugar (95 gms)
- 100 gms butter, at room temperature
- 2 eggs at room temperature (see notes)
- 1 tsp vanilla extract
- 1 cup all-purpose flour (120 gms)
- 1 tsp baking powder
- 1/4 tsp salt, if using unsalted butter
- 2 to 3 green gel food colour
For the frosting
- 250 gms cream cheese at room temperature
- 100 gms butter at room temperature
- 1/4 tsp vanilla extract
- 3/4 to 1 cup icing sugar, sifted (115 gms)
Instructions
- Make one cake batter at a time (see notes if your oven can fit two tins together). I prefer to bake the cakes on day one then assemble and frost on day two. Cut out a large piece of non-stick baking paper and place it over the base of a 9 inch springform tin. Fasten and lightly grease the sides of the pan and the paper on the base will be neatly sealed in. This helps with easier removal of the cake. If you're using a regular round tin, you will need to line the sides with paper as well, so that you can lift the cake out easily. If you don't want to use paper, grease the tin well, and be prepared to invert the cake after it's cooled.
- Make the pink cake. Preheat the oven to 175 C. Beat the butter and sugar in a mixing bowl with a hand mixer on medium speed till pale and fluffy. Add in the eggs, one at a time, beating slowly after each addition. Stir in the vanilla.
- Now sift in the flour, baking powder and salt, if using. Fold gently to combine. Finally, stir in the food colour, until it is evenly blended in. Avoid over-mixing the batter. It is thick, but spreadable and you can add a tablespoon of milk if needed to help it along. (Wipe or rinse your bowl, spoons, beaters to keep them ready for the second batter.)
- Spoon the batter into the prepared cake tin and smoothen the top. Bake for 25 to 30 minutes, rotating the tin halfway through to ensure even browning. A toothpick poked in the center should come out clean.
- Let the cake cool at room temperature for about 20 minutes, then use the paper to lift it and place on a wire rack to cool completely.
- Make the green cake. Repeat the same steps as above including lining the cake tin and the only difference is you'll stir in green food colour this time. Bake the same way as well.
- Once both cakes have cooled to room temperature (you can leave them out overnight, covered), place both in the fridge for 1 hour. This chill time helps firm them up and makes the next few steps much easier.
- When ready to assemble, make the frosting. Beat the cream cheese and butter in a mixing bowl on medium speed until creamy. Stir in the vanilla, then add the sugar and beat again until you have a smooth frosting. I tend to use less sugar so this frosting isn't super thick. If you like you can add sugar, or simply chill it for about 20 minutes to make it easier to spread, particularly if you're working in a hot kitchen.
- Now cut your cakes as shown in the photos below. While these cakes rise quite flat, if you do see any uneven bits, use a sharp knife to level the surface of both cakes. Uneven bumps lead to a less tight checkerboard pattern which could make it difficult to slice the cake.
- Once you're done levelling, work with one cake at a time still placed on the paper it was baked on. Place a 6 inch plate right in the center and use a sharp knife to cut all along the rim of the plate. Lift the plate off, and run your knife around the incision again making sure it's cut all the way through. Next, place a 3 inch bowl in the center of this 6 inch circle and cut it in the same way. Use your fingers to gently push the center circle out from below, followed by the middle circle. You will now have three circles of cake. If you find it difficult to separate the circles, place the cake back in the fridge for 15 minutes, then separate them.
- Repeat this cutting process with the second cake.
- Now assemble as shown in the photos below. I assembled this cake on the base of my springform cake tin itself but you can use a platter or cake stand. Place one green outer circle on the plate, then place a 6 inch pink circle inside it, followed by another green 3 inch circle in the center. Wiggle the circles with your fingers to make sure they fit tightly together. This is your first layer.
- Spread a little less than half the frosting over this layer. Now place a pink outer circle over the frosting, a 6 inch green circle inside it, then a 3 inch pink circle in the center. This is your second layer. Cover with the remaining frosting, pushing it over the edge to cover the sides of the cake as well. Use a metal spatula to help even out the frosting and make it look neat. Decorate with sprinkles if desired.
- Chill the cake for at least 30 minutes to give it a chance to firm up. Slice and be wowed!! While this cake needs all the chilling for convenience, butter cakes tend to dry up when they are in the fridge. For the best texture, let the individual slices sit at room temperature for about an hour before digging in.
- The cake should be stored in the fridge, where it will keep for 5 to 6 days and in the freezer for longer. Happy baking!
Notes
*I have an eggless version of this basic batter here, which you could probably turn into a similar checkerboard cake. Please keep in mind I haven't tried it that way myself.
*You can add add food colour to only one batter, leaving the other batter a natural pale yellow if you prefer. I used Wilton gel food colours here (affiliate link below). If using liquid food colouring instead of gel, you will need about 1 tsp as gel colours are more concentrated.
*This recipe is written keeping in mind one cake tin. If your oven can fit two at a time, you can make both batters in one go, split them into bowls, add food colour and bake them together.
*This recipe can also be made as a four layer cake. Double each batter, then slice each cake in two to make four layers, and assemble as written above. You will need to double the frosting as well. Personally I felt that in a small kitchen space like mine, four layers was cumbersome but if you have the space, it can absolutely be done.
*I don't recommend using any other size of cake tin for this recipe, otherwise your cakes might be too thin or too thick to easily cut circles out of, plus the width of the circles will no longer be proportionate.
*Cook time is per cake if baking one at a time.
*Prep time does not include cooling and chilling/freezing time.