Caramelised Apple Hand Pies (Eggless)
Flaky mini pies with a jammy caramelised apple filling
Prep Time: 30 minutes
Cook Time: 30 minutes
Total Time: 1 hour
Makes: 6 hand pies
Ingredients
For the pie crust
- 1 and 1/4 cups all-purpose flour (150 gms)
- 2 tbsps caster sugar
- 1/4 tsp salt, if using unsalted butter
- 1/2 cup cold butter, cubed (115 gms)
- 1 to 2 tbsps ice water
For the filling
- 3 red apples
- Zest of one orange (or half an orange for a milder flavour)
- 1/4 tsp cinnamon powder
- Pinch of clove powder
- Pinch of nutmeg powder, optional
- 2 to 3 tbsps brown sugar, depending on sweetness of apples
- 1 tbsp butter
- To finish: 2 tbsps cream + 1 tsp water, 2 tbsps granulated sugar
Instructions
- To make the pie crust, combine the flour, sugar and salt, if using, in a large bowl.
- Using your fingertips, rub the cold butter cubes into the flour till the mixture resembles coarse breadcrumbs with a few larger bits of butter scattered through. These bits are what create a flaky dough.
- Add 1 tbsp of ice water and bring the dough together. It will be soft and slightly wet, so sprinkle on a little flour if needed. Add a 2nd tablespoon of water only if absolutely needed. I needed 1.5 tablespoons of water total.
- Form the dough into a ball, place on a large piece of clingfilm and pat into a 3/4th inch thick disc. Wrap tightly and refrigerate for 1 hour. This dough can be chilled or frozen longer, as long as its softened a little before rolling.
- In the meantime, peel, core and dice the apples into small pieces. Combine them in a bowl with the spices, orange zest and sugar. Set aside for 5 minutes for the juices to release.
- Melt the butter in a saucepan on medium heat, then add the apples, scraping out any juices left behind in the bowl. Cook the mixture for 10 to 15 minutes until caramelised, browned and tender. Stir often during this process to prevent burning. Let the filling cool completely at room temperature. I found that the apples get a deeper colour in a stainless steel pan, not so much in a non-stick one in which they become jammy quite quickly, which isn't a bad thing!
- Now unwrap the chilled dough and roll it out into a roughly 9 inch circle, on a floured surface, or silicone mat for convenience. Cut out 6 circles that are 3.5 inches wide (I used a small bowl as a cutter), re-rolling the scraps as needed. Then cut out 6 circles that are 4 inches wide, re-rolling the scraps again as needed. The larger ones will be the covering for the pies, creating a rim around the edge so the top doesn't shrink and crack. If the dough feels too warm or sticky, transfer it back to the fridge to firm up a little. Once your circles are cut out, I definitely recommend placing them in the fridge for about 15 minutes on the mat itself, so that when you transfer them, they don't tear or become misshapen.
- Now transfer the smaller circles to a baking tray lined with non-stick baking paper or a silicone mat. I fit four on a tray at a time, you may be able to do all six together depending on the size of your tray and oven.
- Divide the cooled apple filling evenly among the circles, placing it right in the centre (see photos below). Cover each of the filled circles with the larger circles, pressing the filling down lightly to help it spread, and then seal the edges with your fingers. Crimp the edges with a fork. Chill the pies for 20 minutes before baking.
- Preheat the oven to 175 C. Cut a small cross in the top of each pie for the steam to escape. Mix the cream and water together, then brush over the top of each pie, followed by a sprinkling of the granulated sugar.
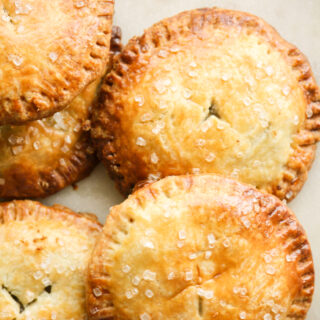
- Bake for 25 to 30 minutes until golden-brown. The edges will brown faster than the top, so you can turn your oven to the broil setting at 150 C for a deeper colour on the surface as well. Keep a watch on them so they don't burn!
- Let the pies cool at room temperature for 10 minutes, then transfer to a wire rack to cool for another 10 minutes. Dig in! I personally think these are best on day one in terms of the crispness of the crust, but you can store them in an airtight tin for 3 to 4 days at room temperature. If it's very warm, then they're best stored in the fridge for a week and in the freezer for a few weeks. Happy baking!
Notes
*Prep-time does not include chilling / cooling time.