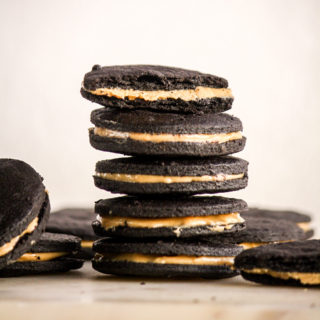
Peanut Butter 'Oreos' (Eggless)
Dark chocolate cookies with a simple peanut butter filling
Prep Time: 30 minutes
Cook Time: 10 minutes
Total Time: 40 minutes
Makes: 26 cookie sandwiches
Ingredients
For the cookie dough
- 1/2 cup caster sugar (95 gms)
- 1/2 cup butter at room temp (115 gms)
- 1 cup all-purpose flour (120 gms)
- 1/2 cup Dutch-process cocoa (40 gms) (see notes)
- 1/4 tsp baking soda
- 1/4 tsp salt if using unsalted butter
For the filling
- 1/2 cup natural peanut butter, at room temp (unsweetened, unsalted; see notes) (135 gms)
- 2 tbsps butter, at room temp
- 3 tbsps icing sugar, sifted
Instructions
- Beat the butter and sugar in a mixing bowl using a hand mixer, till pale and creamy.
- Sift in the flour, cocoa, baking soda and salt, if using. Fold with a silicone spatula to combine, the bring the dough together with your hands. It will start off a bit crumbly but will come together with the warmth of your hands.
- Place the dough on a large piece of clingfilm, flatten into a disc and wrap it tightly. Chill for 30 minutes to 1 hour until firm, but not so hard that you can't roll it.
- Preheat the oven to 160 C and lay a silicone baking mat on the kitchen counter. The mat will help you easily transfer the cookies to the oven.
- Cut the chilled dough in half and place one half back in the fridge. Place the chilled dough on the mat, cover it with a large piece of clingfilm or baking paper and roll it out slowly to about 1/8 inch thickness. You don't want it paper thin, but not too thick either.
- Using a 2-inch round cookie cutter, bottle cap or other tool, cut out cookies in the dough, spacing them about 1/2 inch apart, but don't separate them yet. Slide the mat onto a baking tray and place in the fridge for 20 minutes. This firms up the dough and then the easiest thing to do is use a sharp knife to cut away the scraps (re-roll them for more cookies), leaving the cookies as is on the mat, without the need to lift them and place them on a separate baking tray which could ruin the shape a little bit. I find this method easy and very convenient for warmer kitchens where the dough softens fast. But if you prefer to cut out the cookies on the kitchen counter and then transfer them to a lined baking tray that's fine too.
- Do the same with the other half of the dough. In all, you should have enough cookies to make about 26 cookie sandwiches. I usually make one batch at a time, cutting out the rest while the first batch bakes and creating a sort of assembly line of dough, baking mat, baking tray!
- Bake the cookies for 10 to 12 mins, or until fragrant, darkened and with small cracks on the tops. Let them cool for 10 minutes before transferring to a wire rack to cool completely before filling.
- To make the filling, whisk the peanut butter, butter and sugar in a small bowl until smooth. Keep chilled until ready to use. It should be firm but spreadable.
- Spread about 2 tsps of the filling on the base of half the cookies, then cover with the other half and press down lightly. Place in the fridge for 30 minutes, to help the filling stick better to the cookies and make them easier to eat. Then dig in! Cookies are best stored in the fridge at all times and they will keep for 8 to 10 days.
Notes
*If you're using a peanut butter that already has salt and sugar, you can use unsalted butter and reduce the icing sugar as needed.
*The cookies themselves are bittersweet so if you'd like to use a bit more sugar in the dough, feel free.
*Dutch cocoa is a darker, richer cocoa that is neutral in nature. It generally doesn't react with baking soda, but in this recipe, the soda gives just enough lift that the cookies are not dense, not enough to react with the cocoa and make them cakey. I used Urban Platter Super Dark cocoa here and I've also used Hershey's Super Dark. Read more about the types of cocoa here. If you only have regular natural cocoa on hand, you can use that but the cookies will not be as dark in colour or have that signature Oreo-ish flavour.
*Prep time does not include chilling time.
*Adapted from Hummingbird High