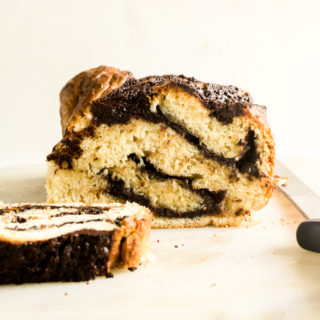
Chocolate Babka
Soft, rich, tender babka with a dark chocolate filling
Prep Time: 45 minutes
Cook Time: 35 minutes
Total Time: 1 hour 20 minutes
Makes: 8 to 10 slices
Ingredients
For the dough
- 1 and 1/4 tsp active dry yeast
- 1/2 cup lukewarm milk (125 ml; you should be able to comfortably dip a finger in)
- 1/4 cup plus 1 tsp caster sugar (50 gms)
- 1 egg, at room temp (see notes)
- 1/2 tsp vanilla extract
- Zest of 1 small lemon (about 1/4 tsp)
- 2 and 1/4 cups all-purpose flour plus more for kneading (270 gms)
- 1/2 tsp salt
- 75 gms unsalted butter, cubed and at room temp
For the filling
- 65 gms dark chocolate, finely chopped (60% to 70%)
- 55 gms unsalted butter, at room temp
- 1/4 cup caster sugar (50 gms)
- 2 tbsps cocoa powder
For the syrup
- 3 tbsps caster sugar
- 2 tbsps water
Instructions
- In a small bowl, combine the yeast, warm milk and 1 tsp sugar. Stir well, cover with clingfilm and set aside for 5 to 10 minutes until frothy.
- In the bowl of a stand mixer fitted with a dough hook (see notes for mixing by hand), combine the 1/4 cup sugar, egg, vanilla and lemon. Mix on low speed to combine, then pour in the yeast mixture.
- Add the flour and salt and let the mixer run on medium speed for 3 to 4 minutes until the dough starts to come together. It is a bit stiff but if it feels too dry to form a mass, add some more milk one tablespoon at a time.
- Now add the butter, one spoon at a time, letting the mixer run and waiting till each piece is incorporated before adding the next. At this stage, the dough is going to look sticky and you'll need to scrape the bowl down a few times in between. If needed, add a couple of tablespoons of flour to help it along. It will take about 5 minutes once all the butter is added, for the dough to become smooth and start pulling away from the sides of the bowl. Once this happens, it's ready to rise. The dough should feel soft and quite supple now.
- Take the dough out of the bowl and place it on a lightly floured surface. Then very lightly oil the mixing bowl, put the dough back in and cover the bowl tightly with clingfilm. Place in the fridge overnight or at least 12 hours. This is a slow rise and the dough will not double, but it will look puffy and increased in size by about half.
- The next day, make the filling. Combine all the ingredients in a small saucepan on low heat and stir constantly until the butter has melted. If there are a few lumps of chocolate, turn off the heat and keep stirring until the mixture is smooth. Set aside for 15 minutes to cool. If it appears too runny to spread, chill it in the fridge for 10 minutes.
- Lightly grease a 9x5 inch loaf tin. Cut out a long piece of baking paper and press it along the base and short sides of the pan, making sure there is enough overhang so that you can lift the babka out easily. Set aside.
- Now get out your chilled dough and place it on a lightly floured surface or a silicone mat (I prefer the mat because it makes transferring the dough to the fridge so easy). Roll it out into a 10x12 inch rectangle.
- Spread the chocolate filling evenly over the dough, leaving a 1/2 inch border on all sides. At this stage I prefer to slide the mat onto a baking tray and let the dough chill for 10 minutes to make rolling it easier.
- Now start at the longer end of the rectangle and roll the dough tightly into a cylinder. Some of the chocolate may ooze out, it's ok.
- Slide the mat back onto a baking tray and place in the freezer for 10 minutes. Then slice the dough in half lengthwise. You will have two 'logs' now. Press the tops of the logs together and then lift one over the other until you have a long, twisted piece of dough, trying to keep the sides where you can see the chocolate facing outwards because that looks best! Since the dough is firm at this point and the chocolate will have hardened, this step takes a little bit of coaxing (but not freezing the dough is really messy, trust me) so do your best and refer to the pictures above as a guide.
- Now lift the dough up and place it gently in the prepared loaf tin. Bend the top and bottom of the dough inwards to fit into the pan as needed. Don't worry about the exact shape right now as the dough will puff up and fill any gaps. Cover the tin with clingfilm and set aside for about 2 hours, until the dough is once again not doubled, but visibly larger and puffier.
- Preheat the oven to 190 C. Remove the clingfilm and bake the babka for 30 to 35 minutes or until a toothpick inserted in the center goes in with no resistance and comes out clean. If the top is browning too fast, cover the tin with foil but I didn't find this necessary.
- Halfway through the baking time, make the syrup. Simply combine the sugar and water in a saucepan over low heat, stirring till the sugar has dissolved. Let the syrup gently boil for 2 to 3 minutes, then set aside to cool.
- When the babka is done, immediately pour the syrup all over the top making sure it reaches everywhere. It will drip down the sides and keep the babka moist and the top nice and crackly!
- Let the babka cool in the tin for 15 minutes, then lift out using the paper overhang and place on a wire rack to cool completely. Although it tastes INCREDIBLE warm :) Once completely cooled, slice and store in an airtight tin in the fridge 3 to 4 days or in the freezer for longer. Reheat individual slices in the toaster or microwave. While you can store it at room temperature too, I prefer the fridge for humid weather. Happy baking!
Notes
*To make this dough without a stand mixer, it's easier to mix the butter in with the sugar first using a hand mixer to get it creamy, then add a lightly beaten egg, yeast and remaining ingredients. It takes some muscle to knead the dough into a smooth ball but it's absolutely possible and will take about 5 to 7 minutes.
*Traditionally, babka is made with eggs. Omitting the egg here is possible by using a little more milk (possibly 2 to 3 extra tablespoons) but while I've done this in other bread doughs, I haven't tried it here so can't guarantee the result.
*It is best to start the dough in the evening, let it rise overnight and then continue with the recipe the next morning.
*Prep-time does not include dough rising time.
*Adapted from Smitten Kitchen